

Heart-Shaped Cherry Cheese Danish are more than just a pastry; they’re a delightful symphony of flavors and textures that capture the essence of pure indulgence. Imagin extracte a flaky, buttery pastry cradling a sweet and tangy cream cheese filling, all crowned with a glistening ruby-red cherry topping. This isn’t just any breakfast treat; it’s an edible declaration of love, perfect for Vnon-alcoholic alentine’s Day, anniversaries, or simply to brighten any ordinary morning. What draws us to this particular Danish? It’s the perfect balance. The richness of the cream cheese mellows the tartness of the cherries, while the delicate layers of the Danish dough offer a satisfying crunch with every bite. This recipe elevates the humble pastry into something truly special, making it a beloved choice for bakers of all levels looking to create a showstopper. Get ready to fall in love with baking these beautiful and delicious treats!

Ingredients:
- 4 ounces cream cheese, softened
- ¼ cup granulated sugar
- 1 large egg yolk
- 1 tablespoon ricotta cheese
- ½ teaspoon almond extract (or vanilla extract, if preferred)
- Pinch of salt
- ½ tablespoon lemon zest
- 2 sheets puff pastry (typically from a 1-box package)
- 1 can (approximately 21 ounces) cherry pie filling
- 1 large egg, plus 1 tablespoon water (for egg wash)
- All-purpose flour, for dusting
Preparing the Cream Cheese Filling
Step 1: Combine Cream Cheese Base
In a medium-sized bowl, begin extract by combining the softened cream cheese and the granulated sugar. Using a spatula or a wooden spoon, vigorously mix these two ingredients until they are smooth and well incorporated. It’s important that the cream cheese is truly softened to room temperature; this will prevent lumps and ensure a silky smooth filling. You don’t need a mixer for this, just a good arm workout and a bit of patience. Once the sugar is fully blended into the cream cheese, add the egg yolk. The egg yolk acts as a binder, giving the filling a richer texture and helping it set beautifully during baking. Mix this in thoroughly until no streaks of egg yolk remain.
Step 2: Enhancing Flavor and Texture
Now it’s time to add the remaining flavor and texture enhancers to our cream cheese mixture. Spoon in the ricotta cheese. The ricotta adds an extra layer of creamy richness and a subtle tang that complements the sweetness of the cream cheese. Next, add your chosen extract. Almond extract offers a delicate, sophisticated nutty note that pairs wonderfully with cherries, while vanilla extract provides a classic, comforting sweetness. Add the pinch of salt – this is crucial for balancing the sweetness gin extract bringing out all the other flavors. Finally, stir in the finely grated lemon zest. The lemon zest provides a bright, zesty aroma and a hint of citrus that cuts through the richness and prevents the filling from being overly sweet. Mix everything together until you have a homogenous, creamy filling. Set this bowl aside while you prepare the puff pastry.
Assembling the Heart-Shaped Cherry Cheese Danishes
Step 3: Preparing the Puff Pastry
Take your two sheets of puff pastry ougin extractf their packaging. Lightly dust a clean work surface with all-purpose flour. This prevents the pastry from sticking. Carefully unfold each sheet of puff pastry onto the floured surface. If your puff pastry is very cold and difficult to unfold, let it sit at room temperature for a few minutes – but be careful not to let it get too warm, as it will become sticky and harder to work with. Using a sharp knife or a pizza cutter, trim the edges of each pastry sheet to create clean, straight lines. You want to start with neat rectangles. Then, cut each rectangular sheet in half lengthwise, so you end up with four long, rectangular strips of pastry.
Step 4: Shaping the Hearts
Now for the fun part – creating the heart shapes! Take one long strip of puff pastry. On one side of the strip, make a straight cut from the top edge down to about two-thirds of the way towards the bottom edge. Then, at the bottom edge, make a diagonal cut upwards towards the center of the strip, creating a V-shape. You should now have a shape resembling a slightly elongated capital ‘L’ attached to a triangle. Repeat this process on the other side of the same strip, creating another ‘L’ shape and a triangle. You’ll end up with a shape that, when its two sides are folded inwards, will resemble a heart. Do this for all four pastry strips. For each strip, you will create two heart shapes. Gently fold the two triangular flaps inward to meet in the center. Press the seams lightly to help them adhere. You can even use a fork to crimp the edges slightly if you wish.
Step 5: Filling and Sealing the Danishes
Once your heart shapes are formed, it’s time to fill them. Carefully spoon about 2 to 3 tablespoons of the canned cherry pie filling into the center of each heart shape, within the folded-in flaps. Be careful not to overfill, as the filling can bubble and spill out during baking. Now, take the large egg and whisk it together with the 1 tablespoon of water in a small bowl. This is your egg wash. Using a pastry brush, gently brush the exposed edges of the puff pastry with the egg wash. This will give your danishes a beautiful golden-brown sheen and help them brown evenly. You can also brush a little egg wash over the cherry filling for added shine.
Baking the Heart-Shaped Cherry Cheese Danishes
Step 6: Baking to Golden Perfection
Preheat your oven to 400°F (200°C). Line a baking sheet with parchment paper. Carefully place your filled and brushed heart-shaped danishes onto the prepared baking sheet, ensuring they have a little space between them to allow for puffing. Place the baking sheet into the preheated oven. Bake for approximately 15-20 minutes, or until the puff pastry is puffed up, golden brown, and the edges are crisp. Keep an eye on them, as puff pastry can brown quickly. If you notice any areas browning too rapidly, you can loosely tent them with aluminum foil. Once baked to perfection, remove the danishes from the oven and let them cool on the baking sheet for a few minutes before transferring them to a wire rack to cool completely. These are best enjoyed warm!

Conclusion:
We’ve reached the delightful conclusion of creating these beautiful Heart-Shaped Cherry Cheese Danishes! I hope you’ve enjoyed following along and are now inspired to bring a touch of homemade charm to your kitchen. These danishes are more than just a treat; they’re a sweet gesture perfect for special occasions, holidays, or simply to show someone you care. The delicate layers of flaky pastry embracing a creamy, sweet cheese filling, topped with vibrant cherry goodness, create a truly irresistible combination.
These danishes are fantastic served warm with a dusting of powdered sugar or a drizzle of icing. They pair wonderfully with a cup of coffee or tea for a luxurious breakfast or brunch. For a more decadent experience, consider serving them alongside fresh berries or a dollop of whipped cream.
Don’t be afraid to get creative with variations! You could try using a different berry filling like raspberry or blueberry, or even incorporate a hint of almond extract into the cream cheese mixture. For a savory twist, consider a lighter, less sweet cheese filling with a savory topping. The possibilities are endless!
So go forth and bake with joy! Mastering the Heart-Shaped Cherry Cheese Danish is a rewarding culinary adventure that’s sure to impress. I encourage you to share your creations and spread the sweetness!
Frequently Asked Questions:
Can I make the pastry dough ahead of time?
Absolutely! You can prepare the puff pastry dough up to two days in advance and store it in the refrigerator. Just make sure to wrap it tightly in plastic wrap to prevent it from drying out. For longer storage, you can freeze the dough for up to a month. Thaw it in the refrigerator overnight before using.
What if I don’t have fresh cherries?
No problem at all! You can easily substitute fresh cherries with frozen cherries or even a good quality canned cherry pie filling. If using frozen cherries, allow them to thaw and drain off any excess liquid before using. If using canned filling, you might want to reduce the amount of added sugar in the cheese mixture slightly, as the filling is already sweetened.
How do I store leftover Heart-Shaped Cherry Cheese Danishes?
Store any leftover danishes in an airtight container at room temperature for up to two days. For longer storage, they can be refrigerated for up to four days. To enjoy them again, you can gently reheat them in a low oven (around 300°F or 150°C) for a few minutes to crisp up the pastry.
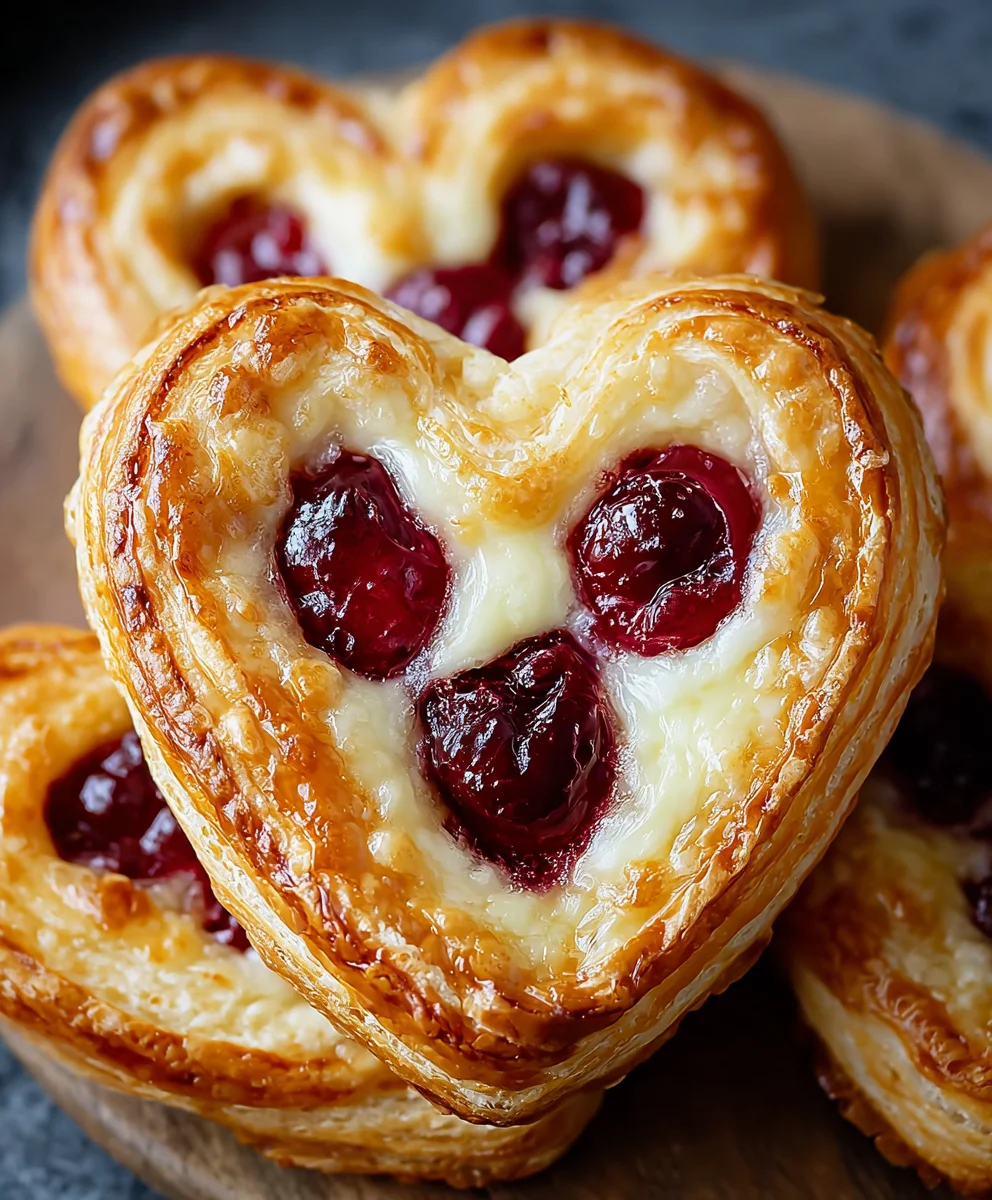
Heart-Shaped Cherry Cheese Danish Delight
Delightful heart-shaped danishes filled with a creamy cheese mixture and sweet cherry pie filling, all encased in flaky puff pastry.
Ingredients
-
4 ounces cream cheese, softened
-
1/4 cup granulated sugar
-
1 large egg yolk
-
1 tablespoon ricotta cheese
-
1/2 teaspoon almond extract
-
Pinch of salt
-
1/2 tablespoon lemon zest
-
2 sheets puff pastry
-
1 can (approximately 21 ounces) cherry pie filling
-
1 large egg, plus 1 tablespoon water (for egg wash)
-
All-purpose flour, for dusting
Instructions
-
Step 1
Combine the softened cream cheese and granulated sugar in a bowl until smooth. Mix in the egg yolk until thoroughly combined. -
Step 2
Add ricotta cheese, almond extract, salt, and lemon zest to the cream cheese mixture. Mix until you have a homogenous, creamy filling. -
Step 3
Lightly dust a work surface with flour. Unfold the puff pastry sheets and trim edges. Cut each sheet in half lengthwise, creating four long strips. -
Step 4
Shape each strip into a heart by making specific cuts and folding in the triangular flaps. Gently press seams to adhere. -
Step 5
Spoon 2-3 tablespoons of cherry pie filling into the center of each heart. Brush the exposed pastry edges with an egg wash made from whisked egg and water. -
Step 6
Preheat oven to 400°F (200°C). Place danishes on a parchment-lined baking sheet. Bake for 15-20 minutes, or until golden brown and puffed.
Important Information
Nutrition Facts (Per Serving)
It is important to consider this information as approximate and not to use it as definitive health advice.
Allergy Information
Please check ingredients for potential allergens and consult a health professional if in doubt.
Leave a Comment