

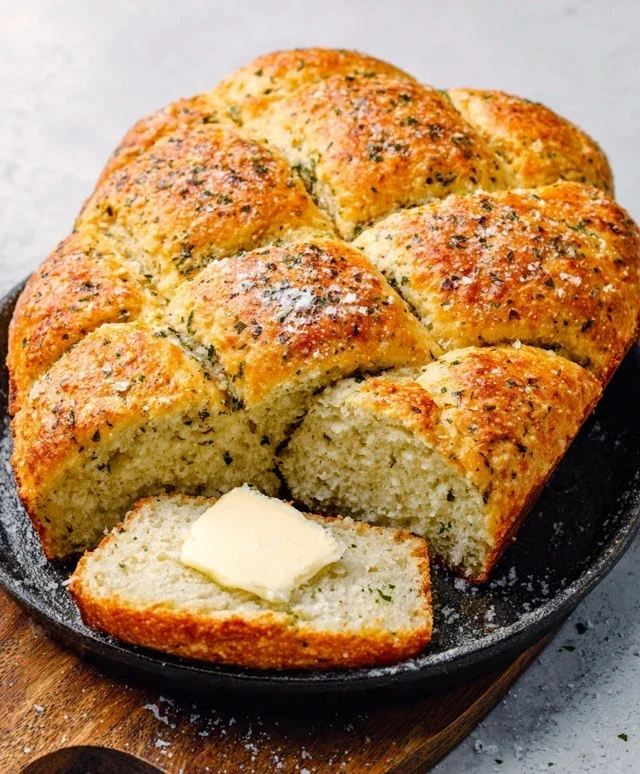
Garlic Butter Keto Bread is about to become your new obsession. If you’ve been dreaming of that warm, comforting aroma filling your kitchen, but thought it was off-limits on your low-carb journey, prepare to have your mind (and taste buds) blown. This isn’t just any bread; it’s a testament to how delicious and satisfying keto can be. We all love bread, don’t we? That perfect, slightly crisp exterior giving way to a wonderfully soft, chewy interior, especially when infused with the irresistible savory punch of garlic and the rich indulgence of butter. What makes this Garlic Butter Keto Bread truly special is its incredible texture and flavor, achieved without a single grain of traditional flour. It’s unbelievably easy to make, perfect for dipping into your favorite soups, serving alongside a hearty meal, or simply enjoying as a guilt-free snack. Get ready to embrace your keto lifestyle with open arms and a slice of this heavenly creation.

This recipe for Garlic Butter Keto Bread is a game-changer for anyone following a low-carb lifestyle. Gone are the days of missing out on the comforting aroma and satisfying chew of freshly baked bread. This recipe uses simple, keto-friendly ingredients to deliver a delicious and surprisingly light bread that’s perfect for toasting, dipping, or serving alongside your favorite meals. It’s quick to whip up, and the results are consistently fantastic. I love making a fresh loaf whenever the craving strikes, and the garlic butter topping adds an irresistible savory punch.
Ingredients:
Making the Dough
1. Preheat and Prepare: Before we even start mixing, the first crucial step is to preheat your oven to 350°F (175°C). This ensures that your bread bakes evenly from the moment it goes in. Next, prepare your baking sheet. I like to line a standard baking sheet with parchment paper. This prevents sticking and makes cleanup a breeze. If you don’t have parchment paper, you can lightly grease the baking sheet, but parchment paper is definitely my preferred method for no-fuss removal.
2. Combine the Dry Ingredients: In a large mixing bowl, we’ll combine all of our dry ingredients. This includes the almond flour, psyllium husk powder, baking powder, salt, and the quarter teaspoon of garlic powder. It’s important to use psyllium husk powder and not the whole husks, as the powder integrates much better into the dough and provides the ideal texture. Whisk these ingredients together thoroughly. You want to make sure the baking powder is evenly distributed for a good rise, and that there are no clumps of almond flour. Taking this extra moment to whisk will ensure a more consistent texture in your final loaf.
3. Combine the Wet Ingredients and Form the Dough: In a separate medium bowl, whisk together the four large eggs. Then, add the quarter cup of melted unsalted butter and the tablespoon of apple cider vinegar. The apple cider vinegar acts as a leavening agent and helps to activate the baking powder, contributing to a lighter crum extractb. Whisk these wet ingredients until they are well combined. Now, gradually add the warm water to the wet ingredients while whisking. Once the wet ingredients are fully incorporated, pour them into the bowl with the dry ingredients. Using a sturdy spoon or a silicone spatula, mix everything together until a cohesive dough forms. It will be a thick, somewhat sticky dough. Don’t be alarmed by the texture; this is normal for keto bread recipes. It’s important to mix until there are no dry pockets of flour or psyllium husk remaining.
Baking the Bread
4. Shape and Bake: Turn the dough out onto your prepared baking sheet. You can either shape it into a rustic loaf or a round flatbread – I often go for a freeform loaf shape as it feels more traditional. If the dough is a bit sticky, you can dampen your hands slightly with water or use a silicone spatula to help shape it. Try to make the surface as smooth as possible for an even bake. Place the baking sheet into your preheated oven. Bake for approximately 35-45 minutes. The exact baking time can vary depending on your oven and the thickness of your loaf. You’ll know it’s done when the bread is golden brown on top and sounds hollow when tapped. A toothpick inserted into the center should come out clean.
The Delicious Garlic Butter Topping
5. Prepare and Apply the Topping: While the bread is still warm, it’s time to add that irresistible garlic butter topping. In a small bowl, combine the four tablespoons of melted unsalted butter with the two cloves of minced garlic and the chopped fresh parsley. If you like a little kick, this is also where you can add a pinch of red pepper flakes. Stir everything together well so the garlic and parsley are evenly distributed in the butter. Once your bread has come out of the oven, immediately brush this glorious garlic butter mixture all over the top. The warmth of the bread will help the butter to melt and soak in, infusing it with amazing flavor.
Once the garlic butter topping is applied, you can let the bread cool completely on a wire rack before slicing. However, if you can resist, slicing and enjoying a piece while it’s still warm is an absolute delight! This bread is fantastic on its own, but it also pairs wonderfully with soups, stews, or as a base for avocado toast. You can store any leftovers in an airtight container at room temperature for a couple of days, or in the refrigerator for longer storage. Reheat slices in a toaster or oven for best results. Enjoy every delicious, low-carb bite!
Conclusion:
So there you have it – your guide to creating a truly exceptional Garlic Butter Keto Bread! This recipe is a game-changer for anyone following a ketogenic lifestyle, offering that satisfying bread experience without the carb overload. The combination of flaky almond flour, rich butter, pungent garlic, and fragrant herbs creates a wonderfully savory and flavorful loaf that’s surprisingly simple to make. It’s incredibly versatile, perfect for dipping in soups, serving alongside your favorite low-carb meals, or even enjoying on its own with a smear of extra butter. I really encourage you to give this Garlic Butter Keto Bread a try; you won’t be disappointed!
Feel free to get creative with variations! You can add a sprinkle of grated Parmesan cheese to the topping for an extra cheesy kick, or mix in some finely chopped chives or parsley into the batter for added freshness. Experiment with different keto-friendly flours if you like, though almond flour is my personal favorite for its texture and flavor profile in this particular recipe.
Frequently Asked Questions:
Can I make this Garlic Butter Keto Bread ahead of time?
Yes, absolutely! You can bake the bread, let it cool completely, and then store it in an airtight container at room temperature for up to 2 days, or in the refrigerator for up to 5 days. It might lose a little crispness in the fridge, so you can briefly toast slices before serving.
What is the best way to store leftover keto bread?
For optimal freshness, store cooled bread in an airtight container. If you plan on keeping it for longer than a few days, consider slicing it and freezing the slices between parchment paper in a freezer-safe bag. This way, you can easily pop out individual slices as needed.
Is this recipe gluten-free?
Yes, this Garlic Butter Keto Bread is naturally gluten-free as it uses almond flour and other keto-friendly ingredients that do not contain gluten.
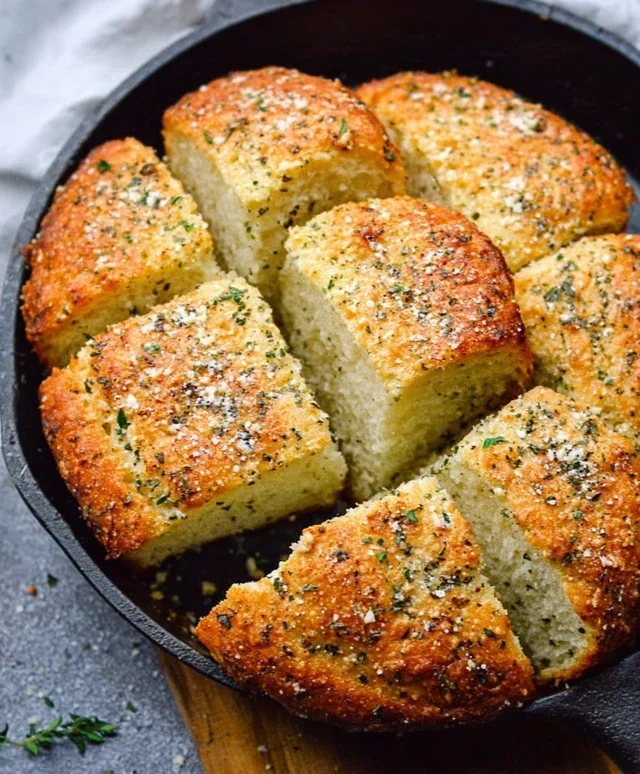
Garlic Butter Keto Bread
A simple and delicious keto-friendly bread recipe flavored with garlic and butter, perfect for low-carb diets.
Ingredients
-
1 1/2 cups almond flour
-
1/4 cup psyllium husk powder
-
2 tsp baking powder
-
1/2 tsp salt
-
3 large eggs
-
1/4 cup melted butter
-
1 tbsp apple cider vinegar
-
1/4 cup water
-
4 tbsp melted butter, for topping
-
2 cloves garlic, minced, for topping
-
1 tbsp chopped fresh parsley, for topping
Instructions
-
Step 1
Preheat oven to 350°F (175°C). Line a loaf pan with parchment paper. -
Step 2
In a large bowl, whisk together almond flour, psyllium husk powder, baking powder, and salt. -
Step 3
In a separate bowl, whisk together eggs, 1/4 cup melted butter, apple cider vinegar, and water. -
Step 4
Pour the wet ingredients into the dry ingredients and mix until a dough forms. The dough will be sticky. -
Step 5
Transfer the dough to the prepared loaf pan and shape it into a loaf. Score the top with a knife if desired. -
Step 6
Bake for 25-30 minutes, or until golden brown and firm. -
Step 7
While the bread is baking, mix the 4 tbsp melted butter with minced garlic and chopped parsley for the topping. -
Step 8
Once the bread is out of the oven, brush the garlic butter mixture over the top. -
Step 9
Let cool slightly before slicing and serving.
Important Information
Nutrition Facts (Per Serving)
It is important to consider this information as approximate and not to use it as definitive health advice.
Allergy Information
Please check ingredients for potential allergens and consult a health professional if in doubt.

Leave a Comment