
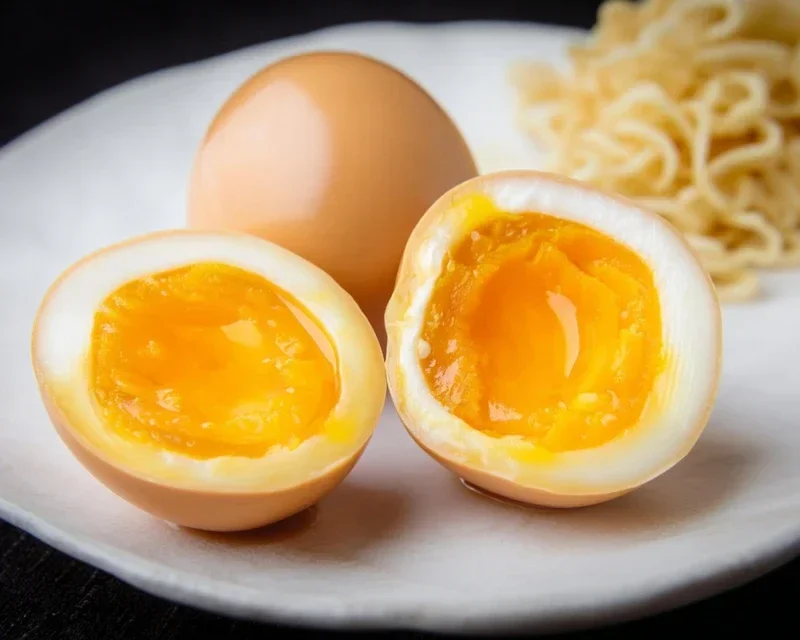
Ramen eggs, also known as Ajitama, are more than just a topping; they are a culinary revelation that can elevate any bowl of ramen from good to utterly unforgettable. I’m convinced that once you’ve experienced the magic of a perfectly marinated ramen egg, you’ll understand why they’ve become such a beloved staple. These aren’t your average hard-boiled eggs! What makes them so special is the incredible transformation they undergo during their soak in a savory, umami-rich marinade. The result is a custardy, vibrant yolk that bursts with flavor, beautifully contrasting with the firm, yet tender, whites that have absorbed the delicious essence of the broth ingredients. They add a luxurious depth and a delightful textural contrast that keeps me coming back for more, and I’m thrilled to share how you can recreate this ramen essential in your own kitchen.

Ramen Eggs (Ajitama)
There’s something incredibly satisfying about a perfectly cooked ramen egg, also known as ajitama. That jammy, golden yolk, infused with a savory-sweet marinade, is the crowning glory of any bowl of ramen. While it might seem intimidating to achieve that ideal texture, I promise you, it’s simpler than you think! With a few key techniques, you can transform ordinary eggs into these flavorful little gems that will elevate your homemade ramen from good to unforgettable. Let’s dive in!
Ingredients:
Cooking Instructions:
Preparing your ajitama involves two main stages: perfectly boiling the eggs and then letting them marinate to perfection. We’ll go through each step meticulously to ensure you achieve that sought-after custardy yolk.
Step 1: Preparing the Eggs for Boiling
The first crucial step is to get your eggs ready for boiling. A common pitfall with soft-boiled eggs is cracking. To minimize this, I recommend taking your eggs out of the refrigerator about 30 minutes before you plan to boil them. Letting them come to room temperature slightly can help prevent them from cracking in the hot water. If you’re in a hurry, you can also prick the wider end of each egg with a pin, but I find the room temperature trick to be quite effective. For the boiling water, I like to add a splash of vinegar (about a tablespoon) to the water. This helps to coagulate any egg white that might escape if a crack does occur, making it less messy.
Step 2: Boiling the Eggs to Perfection
Now, let’s get these eggs into the boiling water. Bring a medium saucepan filled with enough water to cover the eggs completely to a rolling boil. Gently lower your eggs into the boiling water using a slotted spoon. This is important to avoid dropping them and causing them to crack. Once all the eggs are in, reduce the heat slightly to maintain a gentle, steady boil. The magic of the perfect ajitama yolk lies in the precise cooking time. For a wonderfully jammy, slightly runny yolk, I aim for exactly 6 minutes and 30 seconds. Some people prefer 6 minutes for a more liquid yolk, or 7 minutes for a firmer, but still custardy, center. Once the timer goes off, immediately plunge the eggs into an ice bath. This stops the cooking process instantly, preventing the yolks from overcooking and turning chalky. Let them chill in the ice bath for at least 10-15 minutes. This cooling step is just as important as the boiling itself for achieving that ideal texture.
Step 3: Peeling the Eggs with Care
Peeling soft-boiled eggs can be a delicate operation, but with a few tips, you can do it without losing precious egg white. Once the eggs have cooled in the ice bath, gently tap each egg on a hard surface to crack the shell all over. Then, start peeling under cool running water. The running water helps to get under the shell membrane, making it easier to peel away. Start from the wider end of the egg, where there’s usually an air pocket, and gently work your way around. Don’t rush this process; patience is key to preserving the egg’s integrity. If you find a stubborn spot, just let the water run over it for a moment longer.
Step 4: Crafting the Savory Marinade
While your eggs are chilling and being peeled, it’s time to prepare the flavorful marinade that will transform them into ajitama. In a small saucepan, combine the soy sauce, water, non-non-non-alcoholic alternativeic non-alcoholic mirin, and granulated sugar. Heat this mixture over medium heat, stirring occasionally, until the sugar has completely dissolved. You don’t need to bring it to a boil, just a gentle simmer to ensure everything is well incorporated. Once the sugar is dissolved, remove the marinade from the heat and let it cool slightly. This marinade is the soul of your ajitama, so ensure all the ingredients are balanced and the sugar is fully dissolved for a smooth, rich flavor.
Step 5: Marinating the Ajitama
Now for the grand finnon-alcoholic ale! Once your eggs are peeled and the marinade has cooled to room temperature (it’s important it’s not hot, as this could continue to cook the eggs and affect the yolk texture), it’s time to marinate. You can place your peeled eggs in a resealable bag or a small, airtight container. Pour the cooled marinade over the eggs, ensuring they are fully submerged. If you’re using a bag, gently squeeze out any excess air before sealing it. For the best results, I like to marinate my ajitama for at least 4 hours, but ideally overnight. The longer they marinate, the deeper the flavor will penetrate the egg white and infuse that beautiful golden yolk. You can even refrigerate them for up to 3 days, and the flavor will continue to develop. When you’re ready to serve, simply slice the ajitama in half and place them atop your favorite ramen bowl. Enjoy the delicious reward of your perfectly crafted ramen eggs!
Conclusion:
I hope you’ve enjoyed learning how to make these incredibly delicious Ramen Eggs, also known as Ajitama! This recipe is truly fantastic because it transforms a simple boiled egg into a flavor bomb that elevates any dish. The magic lies in the savory, umami-rich marinade, which infuses the perfectly cooked egg yolk with incredible depth. They’re surprisingly easy to make and offer a significant culinary upgrade for minimal effort, making them a staple in my kitchen.
What makes these Ramen Eggs so versatile is their ability to complement a wide array of meals. Of course, they are the quintessential topping for a steaming bowl of ramen, adding that creamy, marinated goodness. But don’t stop there! They are also brilliant in noodle bowls, on top of rice bowls, tucked into sandwiches, or even enjoyed as a standalone snack. The possibilities are truly endless!
Don’t be afraid to experiment with variations either. You can adjust the sweetness or saltiness of the marinade to your preference, or even add a touch of chili oil for a bit of heat. Trying this recipe is a wonderful way to add a professional touch to your home cooking. Give these Ajitama a try – I promise you won’t be disappointed!
Frequently Asked Questions about Ramen Eggs (Ajitama):
How long do Ramen Eggs last in the refrigerator?
Properly stored in an airtight container in the refrigerator, these Ramen Eggs will stay delicious for about 4-5 days. The marinade helps to preserve them, but it’s always best to enjoy them within a week for optimal flavor and texture.
Can I use a different type of soy sauce for the marinade?
Absolutely! While traditional Japanese soy sauce is recommended for its balanced flavor, you can experiment with other types. Light soy sauce will be saltier and less intense, while dark soy sauce will provide a richer color and deeper flavor. Tamari is a great gluten-free option. Just be mindful of the salt content and adjust other ingredients accordingly.
What is the best way to achieve a perfectly jammy yolk?
The key to that perfect jammy yolk in your Ramen Eggs is precise boiling time. For most large eggs, a 6.5 to 7 minute boil after the water reaches a rolling boil is ideal. Immediately plungin extractg them into an ice bath after boiling is crucial to stop the cooking process and make them easier to peel. Experimenting with your specific stove and egg size might be necessary to find your perfect time.

Ramen Eggs (Ajitama)
Perfectly seasoned, soft-boiled eggs infused with a savory marinade, ideal for topping ramen or enjoying as a snack.
Ingredients
-
6 large eggs
-
1/2 cup soy sauce (light sodium)
-
1/4 cup water
-
1/4 cup non-alcoholic mirin
-
2 tablespoons granulated sugar
-
1 tablespoon rice vinegar (optional for boiling eggs)
Instructions
-
Step 1
Gently place the eggs into a pot of cold water. Add rice vinegar if using. -
Step 2
Bring the water to a rolling boil over medium-high heat. Once boiling, reduce heat to medium and cook for exactly 6-7 minutes for a jammy yolk. -
Step 3
Prepare an ice bath by filling a bowl with ice and cold water. Immediately transfer the cooked eggs to the ice bath to stop the cooking process. -
Step 4
While the eggs are cooling, combine the soy sauce, water, non-alcoholic mirin, and granulated sugar in a small saucepan. Heat gently, stirring until the sugar is dissolved. Let the marinade cool completely. -
Step 5
Once the eggs are cool enough to handle, carefully peel them. Be gentle to avoid breaking the yolks. -
Step 6
Place the peeled eggs in a resealable bag or a small container. Pour the cooled marinade over the eggs, ensuring they are fully submerged. -
Step 7
Marinate the eggs in the refrigerator for at least 30 minutes, or preferably for several hours or overnight for deeper flavor. Flip occasionally.
Important Information
Nutrition Facts (Per Serving)
It is important to consider this information as approximate and not to use it as definitive health advice.
Allergy Information
Please check ingredients for potential allergens and consult a health professional if in doubt.



Leave a Comment