

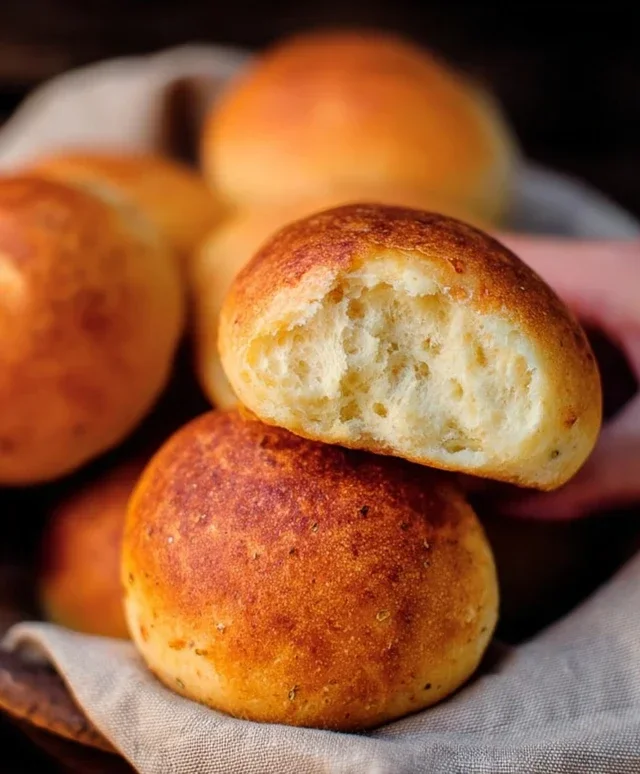
Keto bread rolls are a game-changer, aren’t they? If you’ve been navigating the ketogenic lifestyle, you know the struggle of missing that comforting, satisfying bite of freshly baked bread. For so long, it felt like an impossible dream to enjoy fluffy, airy rolls without derailing your entire day’s carb count. But I’m here to tell you, that dream is now a delicious reality! These keto bread rolls are more than just a low-carb substitute; they’re a revelation. They boast a tender crum extractb, a satisfyingly chewy crust, and a neutral flavor that makes them perfect for everything from slathering with butter to dipping into your favorite soup. What truly makes them special is how effortlessly they replicate the texture and taste we all crave, proving that going keto doesn’t mean sacrificing culinary joy. Prepare to be amazed by just how good a keto bread roll can be!

Keto Bread Rolls
Welcome to a game-changer for any keto enthusiast! If you’ve been missing the comforting embrace of warm, fluffy bread rolls, your search is officially over. These Keto Bread Rolls are incredibly simple to make, surprisingly satisfying, and a perfect accompaniment to almost any meal. Forget those dry, crum extractbly keto bread experiments of the past; these rolls are moist, chewy, and have a delightful cheesy undertone that will make you forget you’re even on a low-carb diet. They’re ideal for dipping in soup, enjoying with butter, or even as a base for a mini sandwich. Let’s get baking!
Ingredients:
Notes on Ingredients:
When it comes to the shredded cheese, a good quality mozzarella or cheddar will work beautifully. Mozzarella tends to provide a wonderfully stretchy, gooey texture, while cheddar offers a sharper, more pronounced flavor. You can even try a blend of both for a truly decadent roll! Make sure your cheese is shredded finely for the best melt. Pre-shredded cheese is convenient, but sometimes contains anti-caking agents that can affect the texture, so if you have the time, shredding your own from a block is often preferred.
Softened cream cheese is key for achieving a smooth batter without lumps. You can achieve this by leaving it on the counter for about 30 minutes to an hour, or by gently microwaving it in short 10-second bursts until it’s pliable. Be careful not to melt it completely.
Almond flour is the foundation of our low-carb baking. Ensure you’re using fine or super-fine almond flour, as this will contribute to a lighter, more tender crum extractb. Almond meal, which is coarser, will result in a denser texture.
For the eggs, we’ll be separating them. This might sound a little intimidating, but it’s a simple process that yields a much lighter and airier roll. The yolks will be incorporated into the main batter, while the whites will be whipped to create structure and lift.
The baking powder is technically optional, but I highly recommend it, especially if you’re new to keto baking. It provides an extra boost of leavening, ensuring your rolls are wonderfully light and puffy. If you’re an experienced baker and prefer to omit it, your rolls will still be delicious, just perhaps a touch denser.
Cooking Instructions:
To begin extract, preheat your oven to 350°F (175°C). This consistent temperature is crucial for even baking, preventing burnt bottoms and undercooked centers. While the oven is preheating, line a baking sheet with parchment paper. This prevents sticking and makes for easy cleanup, which is always a win in my book.
Phase 1: Creating the Cheesy Base
In a medium-sized microwave-safe bowl, combine the 2 cups of shredded cheese and the 1/4 cup of softened cream cheese. Microwave these ingredients in 30-second intervals, stirring well after each interval, until the cheeses are completely melted and well combined. You’re looking for a smooth, cohesive, and slightly stretchy mixture. This process usually takes about 1 to 1.5 minutes in total, depending on your microwave’s power. Be patient and stir thoroughly between each heating period to avoid scorching the cheese. Once melted, remove from the microwave and set aside for a moment to cool slightly.
Phase 2: Incorporating the Dry and Wet Ingredients
Once the cheese mixture has cooled slightly (you don’t want it to cook the eggs!), gently whisk in the 3 egg yolks, one at a time, ensuring each yolk is fully incorporated before adding the next. Next, add the 1 1/2 cups of almond flour and the optional 1 teaspoon of baking powder to the cheesy egg mixture. Stir everything together until just combined. You’ll want to mix until there are no dry streaks of almond flour visible, but be careful not to overmix. The batter will be thick and somewhat sticky at this stage.
Phase 3: Whipping the Egg Whites for Lightness
Now, it’s time to add air to our rolls! In a separate, clean, and dry bowl, beat the 3 egg whites using an electric mixer until stiff peaks form. This means that when you lift the beaters, the egg whites stand up straight and don’t curl over. This step is vital for creating that desirable light and fluffy texture in your keto rolls. Ensure your bowl and beaters are completely free of any grease or yolk, as this will prevent the egg whites from whipping properly.
Phase 4: Gently Folding for the Perfect Dough
This is where the magic happens! Gently fold about a third of the whipped egg whites into the cheese and almond flour mixture using a spatula. Use an under-and-over motion, being careful not to deflate the egg whites. Once that first addition is mostly incorporated, fold in the remaining egg whites in two more additions, continuing to mix gently until just combined. The batter should now be lighter and airier. It will still be a thick, somewhat sticky dough, but noticeably less dense than before.
Phase 5: Shaping and Baking the Rolls
Scoop out portions of the dough using a spoon or a small ice cream scoop and place them onto the prepared baking sheet, leaving about 1-2 inches of space between each roll. You can lightly dampen your hands with water or a little oil if the dough is too sticky to handle for shaping. Aim for roughly golf-ball-sized portions. Bake in your preheated oven for 15-20 minutes, or until the rolls are golden brown on top and firm to the touch. The exact baking time will depend on your oven and the size of your rolls. Keep an eye on them during the last few minutes to prevent over-browning. Once baked, let them cool on the baking sheet for a few minutes before transferring them to a wire rack to cool completely. These are best enjoyed warm, but they also store well in an airtight container at room temperature for a day or two, or can be refrigerated for longer. Enjoy your delicious homemade keto bread rolls!
Conclusion:
I hope you’re as excited about these Keto Bread Rolls as I am! They truly are a game-changer for anyone following a low-carb or ketogenic lifestyle. The beauty of this recipe lies in its simplicity, yielding wonderfully soft and fluffy rolls that are incredibly versatile. Imagin extracte the satisfaction of biting into a warm, freshly baked roll that not only tastes amazing but also fits perfectly into your macros. These rolls are fantastic on their own, slathered with butter, or can serve as the perfect base for your favorite keto-friendly sandwiches. Don’t be afraid to experiment with the suggested variations – adding herbs like rosemary or garlic powder can elevate them even further.
Give these Keto Bread Rolls a try, and I’m confident you’ll be delighted with the results. They’re proof that delicious bread is absolutely achievable on a keto diet. Happy baking!
Frequently Asked Questions:
Why are these Keto Bread Rolls so great?
These Keto Bread Rolls are fantastic because they achieve a wonderfully soft and fluffy texture often missing in keto baked goods. They are also incredibly versatile, working well as a side, for sandwiches, or even as a base for mini pizzas. The recipe is straightforward, making it accessible for bakers of all levels looking for a satisfying low-carb bread option.
Can I freeze these Keto Bread Rolls?
Absolutely! Once completely cooled, you can store these Keto Bread Rolls in an airtight container or freezer bag for up to 2-3 months. To reheat, simply toast them from frozen or let them thaw at room temperature and then warm them in a toaster oven or a low-heat oven for a few minutes until heated through.
What are some other filling ideas for sandwiches using these rolls?
The possibilities are endless! For a classic combo, try them with sliced turkey, avocado, and a smear of mayonnaise. Tuna salad or egg salad are also excellent choices. You can also go with a simple beef ham and cheese, or get creative with cream cheese, smoked salmon, and chives. The neutral flavor of the Keto Bread Rolls makes them a perfect canvas for all your favorite sandwich fillings!

Keto Bread Rolls
Delicious and easy keto bread rolls perfect for low-carb diets. These rolls are fluffy on the inside and slightly crisp on the outside.
Ingredients
-
2 cups shredded cheese (mozzarella or cheddar)
-
1/4 cup cream cheese (softened)
-
1 1/2 cups almond flour
-
3 large eggs (Divided)
-
1 teaspoon baking powder
Instructions
-
Step 1
In a microwave-safe bowl, combine the shredded cheese and cream cheese. Microwave for 60 seconds, stir well, and microwave for another 60 seconds, or until melted and smooth. Stir until fully combined. -
Step 2
Let the cheese mixture cool slightly for a few minutes. Then, stir in the almond flour and baking powder (if using) until a dough forms. -
Step 3
Separate the eggs. Whisk the egg whites until stiff peaks form. In a separate bowl, whisk the egg yolks. -
Step 4
Gently fold the egg yolks into the cheese and almond flour mixture. Then, carefully fold in the whisked egg whites until just combined, being careful not to deflate them. -
Step 5
Preheat your oven to 350°F (175°C). Line a baking sheet with parchment paper. Form the dough into 8-10 small rolls and place them on the prepared baking sheet. -
Step 6
Bake for 15-20 minutes, or until golden brown and cooked through. Let cool on a wire rack before serving.
Important Information
Nutrition Facts (Per Serving)
It is important to consider this information as approximate and not to use it as definitive health advice.
Allergy Information
Please check ingredients for potential allergens and consult a health professional if in doubt.

Leave a Comment