

This Easy Bunny Cake Recipe is your ticket to a truly enchanting dessert that will steal the show at any gathering, especially during spring celebrations! Imagin extracte a delightful, moist cake, perfectly shaped and adorned to resemble the most adorable bunny you’ve ever seen. It’s no wonder why a bunny cake holds such a special place in our hearts; it evokes feelings of joy, wonder, and a touch of playful nostalgia. What makes this particular easy bunny cake recipe so fantastic is its incredible simplicity. You don’t need to be a master baker to achieve stunning results. We’ve designed this recipe so that anyone, from seasoned home cooks to kitchen novices, can whip up this charming treat with minimal fuss and maximum delight. Get ready to create edible magic that’s as fun to make as it is to eat!

Easy Bunny Cake Recipe
Spring is in the air, and that can only mean one thing: it’s time for a bunny cake! This adorable and surprisingly simple cake is perfect for Easter celebrations, spring birthdays, or just because you want to bring a smile to someone’s face. Forget complicated fondant sculptures; this bunny is all about easy assembly and fun decorating. You’ll be amazed at how quickly you can transform a couple of round cakes into a hopping good treat.
This recipe is designed for simplicity, using store-bought cake layers and frosting as a base, but feel free to substitute with your beloved homemade versions if you prefer. The magic truly happens in the assembly and decorating, which is where the creativity shines. Let’s get started on creating your very own Easter bunny centerpiece!
Ingredients:
Making Your Bunny Cake
Phase 1: Preparing the Cakes
First things first, ensure your cake layers are completely cooled. This is a crucial step. If your cakes are even slightly warm, the frosting will melt and slide right off, creating a sticky mess instead of a beautiful bunny. You can bake your cake layers ahead of time and wrap them tightly in plastic wrap once cooled. This makes assembly even quicker on the day you plan to decorate. If you’re using a box mix, follow the package instructions carefully. For homemade cakes, use your go-to vanilla or yellow cake recipe – these classic flavors pair wonderfully with the sweet frosting. Once cooled, gently level the tops of each cake layer with a serrated knife. This ensures a flat surface for stacking and frosting, which will make your bunny look much more polished.
Phase 2: Assembling the Bunny Base
Now for the fun part! Take one of your cooled cake layers and place it flat-side down on your serving platter or cake board. This will be the body of your bunny. Generously spread a layer of white frosting over the top of this first cake layer. You want a nice, even coating. Now, take your second cake layer and place it on top of the frosted first layer. For the head, you’ll need to cut the second cake layer. You can do this in a few ways: either cut a semi-circle from one side to create a more distinct head shape, or simply place it slightly off-center on the bottom layer. For this recipe, we’ll aim for a slightly offset head. Place the second cake layer on top of the first, but shift it so that about one-third of the top cake hangs over the edge of the bottom cake. This offset creates a natural curve that will form the bunny’s neck and head. Once positioned, gently press down to secure it.
Phase 3: Frosting the Bunny Body and Head
Now it’s time to cover our bunny in a fluffy white coat! Using your white frosting, apply a generous amount all over the two stacked cake layers. Use an offset spatula or a butter knife to spread the frosting smoothly. Don’t worry about perfection at this stage; we’ll be adding texture to create a furry look. For the “fur,” take your piping bag fitted with a star tip (or any small, open tip). Fill the piping bag with white frosting. Start piping small stars or dollops of frosting all over the cake, working from the bottom up. Overlap the dollops slightly to create a dense, fluffy texture. Continue this process until the entire cake, including the sides, is covered in this piped fur. Pay special attention to the area where the head meets the body, ensuring a smooth transition.
Phase 4: Creating the Bunny’s Features
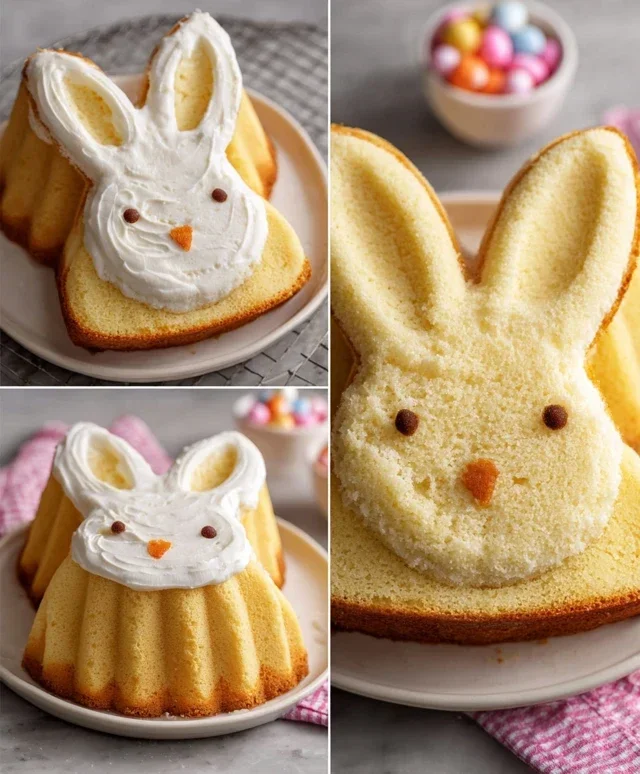
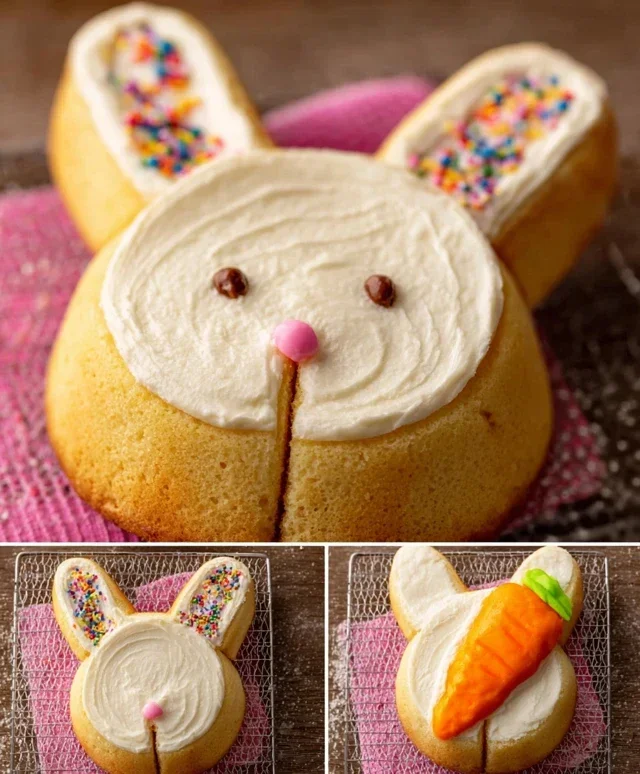
This is where your bunny truly comes to life! For the ears, take your piping bag filled with white frosting (you might need to refill it). Pipe two long, oval shapes extending upwards from the top of the head. You can make them slightly curved or stick straight up – whatever you prefer! If you want a more classic bunny ear shape with a pink inner ear, you’ll need your pink frosting. Fill a separate piping bag with pink frosting (either pre-colored or colored with gel food coloring). Pipe a thinner, inner ear shape onto each white ear. For the eyes, use your chocolate icing or melted chocolate. Fit a piping bag with a very small round tip or snip a tiny corner off a ziploc bag. Pipe two small dots for the eyes. For the nose, pipe a small pink heart or a round dot of pink frosting. And for the whiskers, use your chocolate icing to pipe a few thin lines extending from the nose area.
Phase 5: Adding the Finishing Touches and Decorations
Almost there! Now that your bunny has its basic features, let’s add some personality and color. You can use jellybeans or colorful round candies to decorate the bunny’s belly or to create a cheerful border around the base of the cake on the serving platter. You can also place a few strategically around the cake for a festive touch. If you’re feeling adventurous, you can use a small amount of leftover pink frosting to pipe a little tail on the back of the bunny. This is a simple dollop of frosting. Once all your decorations are in place, step back and admire your handiwork! This easy bunny cake is sure to be a hit with everyone. It’s a wonderful way to celebrate the season and enjoy a delicious homemade treat. Don’t forget to take a picture before you dive in!
Conclusion:
And there you have it – your very own adorable and incredibly Easy Bunny Cake Recipe! This recipe truly shines because it’s designed for success, even if you’re a begin extractner baker. The simple steps, readily available ingredients, and guaranteed delightful result make it a winner for any occasion, especially spring celebrations or Easter gatherings. You’ll be amazed at how quickly this charming bunny comes together, bringin extractg smiles to everyone’s faces.
This bunny cake isn’t just a dessert; it’s a conversation starter! Serve it as the centerpiece for your next brunch or family get-together. It pairs wonderfully with fresh berries, a dollop of whipped cream, or even a light custard. For variations, don’t be afraid to get creative! You could experiment with different cake flavors like lemon or carrot cake, or switch up the frosting colors to create unique bunny personalities. Consider adding edible glitter for a touch of sparkle or using mini M&Ms for button eyes. I truly encourage you to give this Easy Bunny Cake Recipe a try – it’s a joy to make and even more of a joy to share.
Frequently Asked Questions:
Can I make this bunny cake ahead of time?
Yes, you absolutely can! The cake layers can be baked a day in advance and stored at room temperature, wrapped tightly in plastic wrap. The frosting can also be made ahead and refrigerated. It’s best to assemble and decorate the cake closer to serving time for optimal freshness, but the components hold up well.
What’s the best way to get clean cuts when slicing the cake?
For the cleanest cuts, especially with frosted cakes, I recommend using a sharp knife dipped in hot water and wiped dry between each slice. This helps prevent the frosting from smearing and ensures a neat presentation.
Can I use a different type of frosting?
Certainly! While the cream cheese frosting is delicious, feel free to use your favorite buttercream, a simple vanilla glaze, or even a chocolate frosting if that’s more to your liking. Just ensure it’s a consistency that’s easy to spread and pipe for decorating.
Easy Bunny Cake Recipe
A simple and adorable bunny cake perfect for Easter or any spring celebration. This recipe uses ready-made components for ultimate ease.
Ingredients
-
Two round cake layers (use one cake mix or your favorite homemade recipe)
-
White frosting (ready-made or your favorite homemade recipe)
-
Pink frosting (or use pink gel food coloring on white frosting)
-
Chocolate icing or melted chocolate for details
-
Jellybeans or colorful round candies
-
Piping bags
Instructions
-
Step 1
Prepare and bake the two round cake layers according to package directions or your favorite recipe. Let them cool completely. -
Step 2
Place one cooled cake layer on your serving platter. Frost the top generously with white frosting. -
Step 3
Place the second cake layer on top of the first. Frost the entire cake with white frosting, creating a smooth bunny shape. You can use the frosting to sculpt basic bunny ears on top. -
Step 4
Using pink frosting in a piping bag, create the bunny’s nose and inner ears. Use chocolate icing or melted chocolate to pipe eyes and a mouth. -
Step 5
Decorate the cake with jellybeans or colorful round candies around the base for a festive touch. -
Step 6
Chill the cake for about 15-20 minutes before serving to allow the frosting to set slightly.
Important Information
Nutrition Facts (Per Serving)
It is important to consider this information as approximate and not to use it as definitive health advice.
Allergy Information
Please check ingredients for potential allergens and consult a health professional if in doubt.

Leave a Comment