
Creamy Pickle Roll Ups are the unsung heroes of any gathering, a flavor explosion that consistently disappears from the appetizer table with lightning speed. But what is it about these simple, yet utterly delicious, bites that makes them so addictive? It’s the brilliant marriage of textures and tastes: the satisfying crunch of the pickle, perfectly softened but still holding its own, embraced by a lusciously creamy filling that balances the brine with a hint of tang and richness. People adore them because they’re surprisingly easy to make, requiring minimal fuss but delivering maximum impact. They’re the perfect accompaniment to game nights, potlucks, or just a Tuesday evening when you need a little something special. What truly sets these Creamy Pickle Roll Ups apart is their versatility – a blank canvas for your favorite savory additions, transforming a simple concept into a truly memorable culinary experience.

Ingredients:
- 8 ounces cream cheese, softened
- 2 tablespoons ranch seasoning
- ½ cup dill pickle relish or finely chopped dill pickles
- 16 ounces crescent roll dough (two 8-ounce cans)
- ¼ cup butter, melted
- 1 tablespoon fresh dill or 1 teaspoon dried dill
Preparing the Creamy Pickle Filling
The heart of our Creamy Pickle Roll Ups lies in this incredibly flavorful filling. Start by ensuring your cream cheese is at room temperature. This is crucial for achieving a smooth, lump-free mixture that will spread easily. If you forgot to leave it out, you can quickly soften it by microwaving it in 15-second intervals, stirring in between, until just pliable. In a medium bowl, combine the softened cream cheese with the ranch seasoning. I like to use a rubber spatula or a sturdy spoon to really work these together until they are thoroughly incorporated and there are no white streaks of cream cheese remaining. This also helps to break down any clumps in the seasoning packet. Next, we’ll add our star ingredient: the dill pickle relish. If you’re using chopped dill pickles, make sure they are finely minced; we want the texture to be distributed evenly throughout the filling without large chunks. Stir the relish into the cream cheese and ranch mixture. This is also the perfect time to add your dill. If you’re using fresh dill, give it a rough chop to release its oils and aroma. If you’re opting for dried dill, measure it out carefully, as dried herbs can be more potent. Mix everything together until it’s uniformly combined. The filling should be thick, creamy, and have a delightful tangy aroma from the pickles and ranch. Set this aside while you prepare the crescent roll dough.
Assembling the Roll Ups
Now for the fun part – assembling our roll ups! Open both cans of crescent roll dough. You’ll find that each can contains dough triangles that are perforated to be separated. Carefully unroll each set of triangles and lay them out on a clean, dry surface. You can either lay them out separately or, for larger roll ups, you can press the perforations together to form a larger rectangle. I prefer to press them together to minimize the seams and create a more uniform base for our filling. Gently press the seams together with your fingers or the side of a butter knife to seal them. Once your crescent roll dough is prepared as a large rectangle (or two), it’s time to spread our delicious creamy pickle filling. Using your spatula, evenly distribute the filling over the surface of the dough, leaving about a ½-inch border along one of the longer edges. This border will help to prevent the filling from oozing out too much when we roll them up. Make sure to get a good, even layer of filling across the entire dough surface. Don’t overload it, but don’t be shy either; we want plenty of that tangy, creamy goodness in every bite.
Rolling and Slicing
This is where our Creamy Pickle Roll Ups start to take shape. Starting from the long edge with the filling spread all the way to the edge (but not the ½-inch border we left), begin extract to tightly roll up the dough. As you roll, try to keep the roll as compact as possible. This ensures even slices and a pleasing presentation. If the dough tears slightly, don’t worry; you can usually press it back together. Once you have a tightly rolled log, you’ll want to gently pinch the seam to seal it securely. This will prevent the filling from escaping during the baking process. Now, for slicing, it’s helpful to use a sharp knife. You can gently score the log first to get an idea of how many pieces you want, or just go straight for the cut. Aim for slices that are about ¾ to 1 inch thick. If the log becomes difficult to cut due to the filling, you can place it in the refrigerator for about 15-20 minutes to firm up slightly before slicing. This makes for cleaner cuts. Arrange the sliced roll ups on a baking sheet lined with parchment paper or a silicone baking mat. Give them a little space between each one, as they will puff up and expand as they bake.
Baking to Golden Perfection
The final stage is baking our delightful Creamy Pickle Roll Ups. Preheat your oven to 375 degrees Fahrenheit (190 degrees Celsius). This moderate temperature allows the crescent roll dough to cook through and turn golden brown without burning the filling. Place the baking sheet with the arranged roll ups into the preheated oven. Bake for approximately 15 to 20 minutes. You’ll want to keep an eye on them, as oven temperatures can vary. They are ready when they are puffed up, golden brown on top, and the seams are well-senon-alcoholic aled. You might see a little bit of the creamy filling bubble out, which is perfectly normal and often indicates they are done and delicious. Once they have reached that beautiful golden hue, carefully remove the baking sheet from the oven. Let them cool on the baking sheet for a few minutes before transferring them to a wire rack to cool further. This initial cooling period on the baking sheet helps them set up.
Finishing Touches and Serving
The final step is to add a touch of richness and extra flavor. While the roll ups are still warm, it’s time for our melted butter and optional extra dill. In a small bowl, melt the butter. You can do this in the microwave or on the stovetop. Once melted, brush the tops of the warm roll ups generously with the melted butter. This adds a lovely sheen and a subtle buttery flavor that complements the tangy filling beautifully. If you like, you can sprinkle a little extra fresh or dried dill over the top of the buttered roll ups for an intensified dill aroma and flavor. Serve these Creamy Pickle Roll Ups warm. They are fantastic as an appetizer, a side dish, or even a fun snack. They pair wonderfully with dips like sour cream and onion, or a simple marinara sauce, though they are incredibly delicious all on their own. Enjoy the delightful combination of flaky pastry, creamy, tangy filling, and the satisfying bite of pickle!
Conclusion:
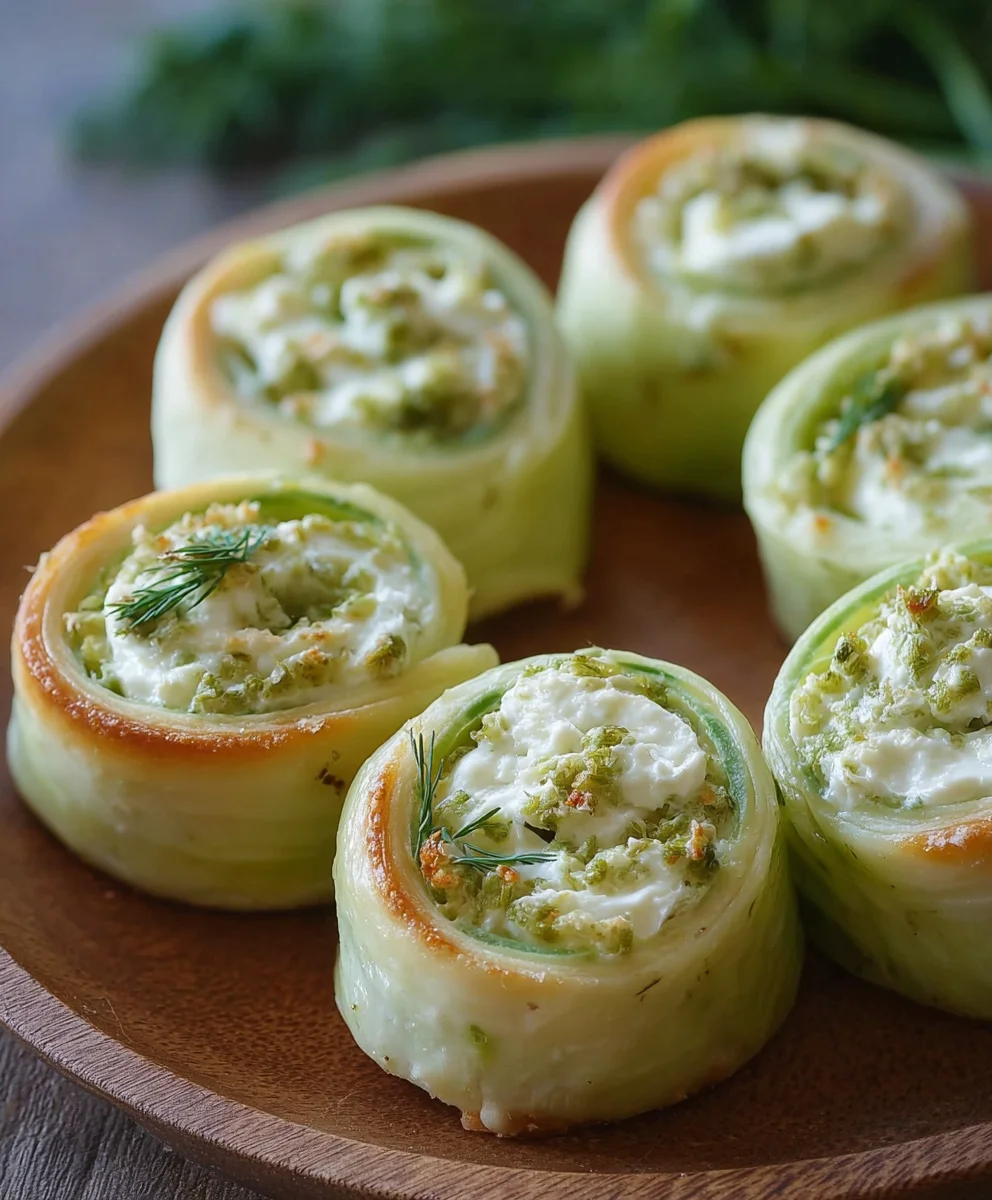
There you have it – your guide to creating the most delightful Creamy Pickle Roll Ups! This recipe is truly a winner, offering a fantastic balance of tangy pickles and creamy filling wrapped in a soft tortilla. They’re perfect for any occasion, from a quick snack to a crowd-pleasing appetizer. Don’t be afraid to get creative with your fillings and enjoy the process!
For serving, these Creamy Pickle Roll Ups are best enjoyed fresh, but they also hold up surprisingly well for a few hours in the refrigerator, making them ideal for make-ahead parties. Consider serving them alongside a platter of other finger foods or even as a fun lunchbox treat. As for variations, feel free to experiment with different types of pickles – dill, bread and butter, or even spicy ones! You can also swap out the cream cheese for a lighter alternative like Neufchâtel cheese or even a whipped feta for a different flavor profile. Some even add a sprinkle of fresh dill or chives to the filling for an extra burst of freshness. I encourage you to play around and find your perfect combination!
Frequently Asked Questions:
Can I make Creamy Pickle Roll Ups ahead of time?
Yes, you can! It’s best to assemble them a few hours before serving. Wrap them tightly in plastic wrap and refrigerate. For longer storage, it’s advisable to leave the pickles whole or in larger pieces and roll them just before serving to prevent the tortillas from becoming too soggy.
What kind of tortillas work best for Creamy Pickle Roll Ups?
Standard flour tortillas are generally the most pliable and work wonderfully. You can also try whole wheat or even gluten-free tortillas if needed. The key is to ensure they are soft and flexible enough to roll without cracking.

Creamy Pickle Roll Ups-Easy Appetizer Recipe
An easy and flavorful appetizer featuring creamy, tangy dill pickle filling wrapped in flaky crescent roll dough, baked to golden perfection.
Ingredients
-
8 ounces cream cheese, softened
-
2 tablespoons ranch seasoning
-
½ cup dill pickle relish or finely chopped dill pickles
-
16 ounces crescent roll dough (two 8-ounce cans)
-
1 tablespoon fresh dill or 1 teaspoon dried dill
-
1/4 cup butter, melted
Instructions
-
Step 1
Prepare the filling: Combine softened cream cheese, ranch seasoning, dill pickle relish, and dill in a bowl. Mix until smooth and well-combined. -
Step 2
Assemble the roll ups: Unroll crescent dough and press perforations together to form a rectangle. Spread the creamy pickle filling evenly over the dough, leaving a ½-inch border on one long edge. -
Step 3
Roll and slice: Tightly roll the dough from the filled long edge. Pinch the seam to seal. Slice the log into ¾ to 1-inch thick pieces. -
Step 4
Bake: Preheat oven to 375°F (190°C). Arrange roll-ups on a parchment-lined baking sheet and bake for 15-20 minutes, or until golden brown and puffed. -
Step 5
Finish and serve: While warm, brush the tops of the roll-ups with melted butter and sprinkle with extra dill, if desired. Serve warm.
Important Information
Nutrition Facts (Per Serving)
It is important to consider this information as approximate and not to use it as definitive health advice.
Allergy Information
Please check ingredients for potential allergens and consult a health professional if in doubt.



Leave a Comment