

Cheesy Garlic Chicken Wraps are your new weeknight savior! If you’re anything like me, you’re always on the hunt for meals that are both incredibly delicious and surprisingly easy to whip up. This dish perfectly fits the bill, offering a comforting blend of tender chicken, aromatic garlic, and gooey, melted cheese, all hugged by a soft tortilla. It’s no wonder Cheesy Garlic Chicken Wraps have become a go-to for families and busy individuals alike. The magic truly lies in the simplicity of its preparation meeting the richness of its flavor profile. What makes these wraps so special is the irresistible combination of savory garlic butter chicken tucked inside, creating a flavor explosion that’s both familiar and exciting. Get ready to impress yourself and everyone at your table with these fantastic Cheesy Garlic Chicken Wraps.

Cheesy Garlic Chicken Wraps
These Cheesy Garlic Chicken Wraps are an absolute lifesaver for busy weeknights, quick lunches, or even a fun weekend treat. They’re incredibly simple to throw together, packed with flavor, and wonderfully satisfying. The creamy garlic aioli, savory shredded chicken, and gooey melted cheddar cheese are a winning combination that will have everyone asking for seconds. Forget boring sandwiches; these wraps are a step up in deliciousness and utterly customizable. Let’s get cooking!
Ingredients:
Preparing Your Filling
The beauty of these wraps lies in their simplicity, and the first step is all about bringin extractg our delicious filling together. We’re starting with cooked chicken, which makes this recipe incredibly fast. If you don’t have pre-cooked chicken on hand, you can easily roast or poach a chicken breast or two and shred it yourself. Rotisserie chicken is also a fantastic shortcut and often already seasoned.
First, grab a medium-sized mixing bowl. Add your 2 cups of shredded cooked chicken to the bowl. Now, it’s time for the star of the show: the garlic aioli. Spoon in your 1/2 cup of garlic aioli. This is where the magic happens, as the aioli coats the chicken, infusing it with that wonderful garlicky creaminess. Use a spoon or a spatula to gently toss the chicken and aioli together, ensuring every strand of chicken is well-coated. You want a lovely, creamy consistency.
Next, we’re adding the cheese. Sprinkle in your 1 cup of shredded cheddar cheese. Again, gently mix this into the chicken and aioli mixture. The cheese will start to soften and bind everything together, making it extra delightful. Don’t overmix at this stage; we want to keep some of that lovely shredded texture.
Now, let’s talk about seasoning. Taste the mixture. Does it need a little something extra? Add salt and pepper to taste. The amount you need will depend on how salty your chicken and aioli were to begin extract with. A good starting point is about 1/4 teaspoon of salt and 1/8 teaspoon of black pepper, but adjust as your palate dictates. Stir everything together one last time to distribute the seasonings evenly. This filling is now ready to be wrapped!
Assembling and Warming Your Wraps
With our flavorful filling prepared, the next phase is all about assembling and warming these delicious parcels. We want that cheese to be melty and gooey, and the tortilla to be warm and pliable.
Lay one of your 4 large tortillas flat on a clean surface. If your tortillas are a bit stiff, you can warm them slightly in a dry skillet or in the microwave for about 15-20 seconds to make them more flexible and easier to work with. This prevents them from cracking when you roll them up.
Spoon about one-quarter of your cheesy garlic chicken filling onto the center of the tortilla. You want to create a nice, even line of filling across the tortilla, leaving some space at the edges. Don’t overfill, or your wrap will be difficult to close and might burst open during cooking.
Now, it’s time to roll! Fold in the sides of the tortilla over the filling. Then, starting from the edge closest to you, tightly roll up the tortilla, tucking in the filling as you go. Aim for a snug roll to keep everything contained. Repeat this process with the remaining three tortillas and the rest of the filling. You should now have four beautifully formed wraps, ready for their final touch.
Grilling or Pan-Frying for the Perfect Finish
The final step is to give our wraps that irresistible golden-brown, slightly crispy exterior and ensure the cheese inside is perfectly melted. You have a couple of excellent options here: grilling or pan-frying. Both methods yield delicious results.
Grilling Method
If you have a grill or a grill pan, this is a fantastic way to get those lovely grill marks and a subtle smoky flavor. Preheat your grill or grill pan over medium heat. Lightly brush the outsides of each wrap with a little oil or melted butter. This helps them get crispy and golden brown.
Place the wraps seam-side down on the preheated grill or grill pan. Grill for about 3-5 minutes per side, or until the tortillas are golden brown and slightly crisp, and the cheese inside is melted and gooey. Keep an eye on them to prevent burning.
Pan-Frying Method
If grilling isn’t an option, a simple skillet will do the trick beautifully. Heat a large skillet or griddle over medium heat. Add a teaspoon of oil or butter to the skillet.
Once the skillet is hot, carefully place the wraps in the pan, seam-side down. Cook for about 3-5 minutes per side. You’re looking for that same golden-brown, slightly crispy texture and wonderfully melted cheese. Again, adjust the heat as needed to ensure they cook through without burning. You can press down gently with a spatula to help them cook evenly.
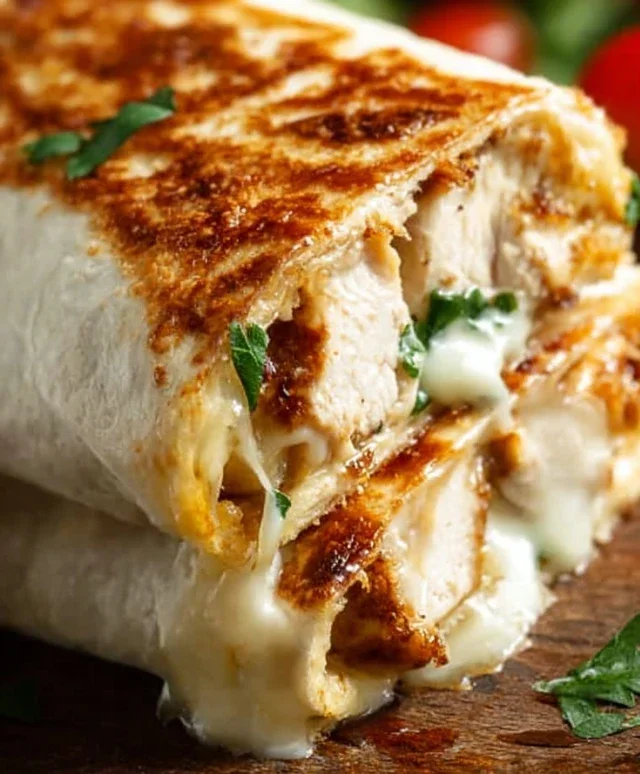
Once both sides are beautifully browned and the cheese is delightfully melted, remove the wraps from the heat. They should be warm, inviting, and smell absolutely divine.
Serving Your Cheesy Garlic Chicken Wraps
Your Cheesy Garlic Chicken Wraps are now ready to be devoured! Let them rest for just a minute or two before slicing them in half, if desired. This allows the filling to settle slightly, making them easier to handle. Serve them immediately while they are warm and the cheese is perfectly melty. These wraps are fantastic on their own, but they also pair wonderfully with a side salad, some crunchy tortilla chips, or a dollop of extra garlic aioli for dipping. Enjoy every delicious bite of this easy and incredibly satisfying meal!
Conclusion:
So there you have it – your guide to creating the most delicious and satisfying Cheesy Garlic Chicken Wraps! I truly believe this recipe is a winner because it strikes the perfect balance between comforting familiarity and exciting flavor. The tender, garlicky chicken, enveloped in melted cheese and wrapped in a warm tortilla, is simply irresistible. It’s quick enough for a busy weeknight dinner but impressive enough for casual entertaining. Don’t hesitate to give these Cheesy Garlic Chicken Wraps a try; I’m confident you’ll love them as much as I do!
For serving, these wraps are fantastic on their own, but they also pair wonderfully with a crisp side salad, some seasoned sweet potato fries, or even a cup of your favorite soup. Think of them as your versatile culinary canvas!
Now, let’s talk variations! If you’re feeling adventurous, consider adding a pinch of smoked paprika to your chicken for an extra layer of smoky depth, or perhaps some finely chopped jalapeños for a touch of heat. You could also swap out the shredded cheddar for Monterey Jack or a spicy pepper jack for a different cheesy profile. Even a drizzle of your favorite hot sauce right before wrapping can add a delightful kick!
Frequently Asked Questions:
Can I make the cheesy garlic chicken ahead of time?
Absolutely! You can prepare the cheesy garlic chicken mixture a day in advance and store it in an airtight container in the refrigerator. This will save you even more time when you’re ready to assemble and heat your wraps.
What kind of tortillas work best for these wraps?
Pretty much any kind will work! Flour tortillas are a popular choice for their pliability, but whole wheat tortillas offer a slightly heartier option. You could even try larger corn tortillas if you prefer. Just make sure they are warmed slightly before filling to make them easier to fold and prevent tearing.
Is there a way to make these wraps healthier?
Certainly! To lighten things up, you could use lean chicken breast, opt for reduced-fat cheese, and load up on extra veggies like spinach, bell peppers, or onions within the wrap. Using whole wheat tortillas also adds more fiber. You might also consider grilling or baking the chicken instead of pan-frying, and using less oil.
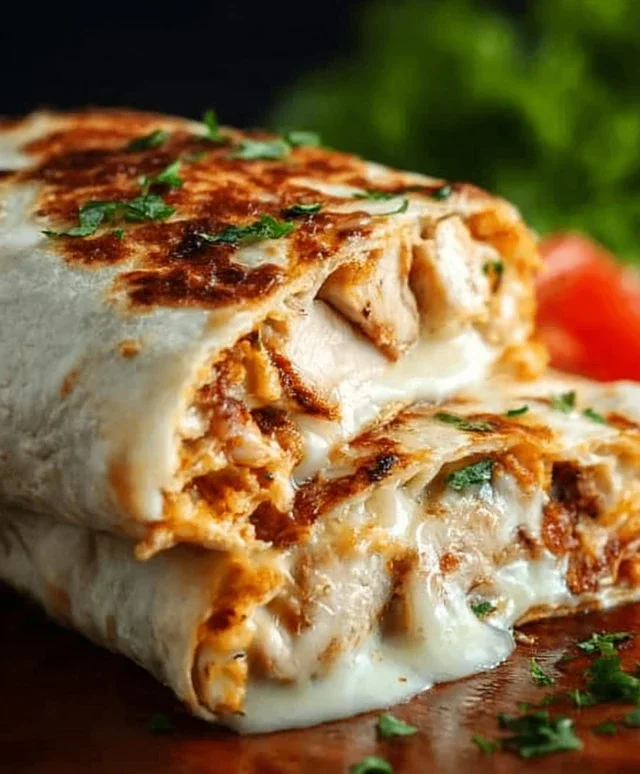
Cheesy Garlic Chicken Wraps
Quick and easy wraps filled with savory shredded chicken, creamy garlic aioli, melted cheddar cheese, all wrapped in a soft tortilla.
Ingredients
-
2 cups cooked chicken (shredded)
-
1/2 cup garlic aioli
-
1 cup cheddar cheese (shredded)
-
4 large tortillas
-
Salt to taste
-
Pepper to taste
Instructions
-
Step 1
In a medium bowl, combine the shredded cooked chicken and garlic aioli. Mix well until the chicken is evenly coated. -
Step 2
Season the chicken mixture with salt and pepper to your preference. -
Step 3
Lay out the four large tortillas on a clean surface. -
Step 4
Divide the chicken mixture evenly among the tortillas, spreading it over the center of each. -
Step 5
Sprinkle the shredded cheddar cheese generously over the chicken mixture on each tortilla. -
Step 6
Fold in the sides of each tortilla and then tightly roll them up to form the wraps. -
Step 7
Optional: Heat the wraps in a skillet or panini press for a few minutes per side until golden brown and the cheese is fully melted.
Important Information
Nutrition Facts (Per Serving)
It is important to consider this information as approximate and not to use it as definitive health advice.
Allergy Information
Please check ingredients for potential allergens and consult a health professional if in doubt.
Leave a Comment