

Bunny Rabbit Cake is more than just a dessert; it’s a burst of springtime joy and a guaranteed smile-maker, especially for the little ones in your life. Imagin extracte the delighted squeals as this adorable creation is unveiled, its fluffy ears and sweet demeanor ready to be devoured. There’s something undeniably magical about a cake shaped like a beloved bunny. It transforms any gathering into a festive occasion, evoking childhood wonder and the excitement of Easter or any springtime celebration. What truly sets this Bunny Rabbit Cake apart is its inherent charm and the sheer fun of decorating it. It’s a project that invites creativity, allowing you to personalize your bunny with colorful frosting, candy whiskers, and edible eyes. This recipe is designed to be approachable, ensuring that even if you’re not a seasoned baker, you can create a show-stopping Bunny Rabbit Cake that will be the star of your table.

Bunny Rabbit Cake
This Bunny Rabbit Cake is an absolute delight, perfect for Easter, birthdays, or any occasion that calls for a touch of whimsical sweetness. Imagin extracte a fluffy, tender cake, expertly shaped and decorated to resemble the most adorable bunny. It’s a project that’s as fun to make as it is to eat, and the look on everyone’s face when they see it is truly priceless. Don’t be intimidated by the shaping; it’s surprisingly straightforward, and even if your bunny isn’t perfectly symmetrical, its charm will shine through. Let’s get started on creating this unforgettable centerpiece!
Ingredients:
Baking the Cake Layers
First, preheat your oven to 350°F (175°C). Grease and flour two 8-inch round cake pans. You can also line the bottoms with parchment paper for extra insurance against sticking, which is always a good idea for a smooth release. In a medium bowl, whisk together the flour, baking powder, and salt. This ensures that your leavening agents are evenly distributed, leading to a consistent rise.
In a large bowl, cream together the softened butter and granulated sugar until light and fluffy. This process incorporates air, which contributes to a tender cake crum extractb. Next, beat in the eggs, one at a time, ensuring each is fully incorporated before adding the next. Stir in the vanilla extract. Now, it’s time to alternate adding the dry ingredients and the milk to the wet ingredients. Begin extract by adding about a third of the flour mixture, mixing until just combined. Then, add half of the milk, mixing again. Continue this pattern, ending with the flour mixture. Be careful not to overmix at this stage; overmixing can develop the gluten in the flour too much, resulting in a tough cake. Mix just until no streaks of flour remain.
Divide the batter evenly between the two prepared cake pans. Smooth the tops with a spatula. Bake for 30-35 minutes, or until a wooden skewer or toothpick inserted into the center comes out clean. Let the cakes cool in the pans for about 10-15 minutes before inverting them onto a wire rack to cool completely. Allowing them to cool thoroughly is crucial before frosting and decorating, otherwise, your frosting will melt.
Assembling and Shaping the Bunny
Once your cake layers are completely cool, it’s time to bring our bunny to life! This is where the magic happens. You’ll need one of the round cakes to be the body and the other to be the head and ears. Take one of the cooled cake rounds and place it on your serving platter or cake board. This will be the bunny’s body.
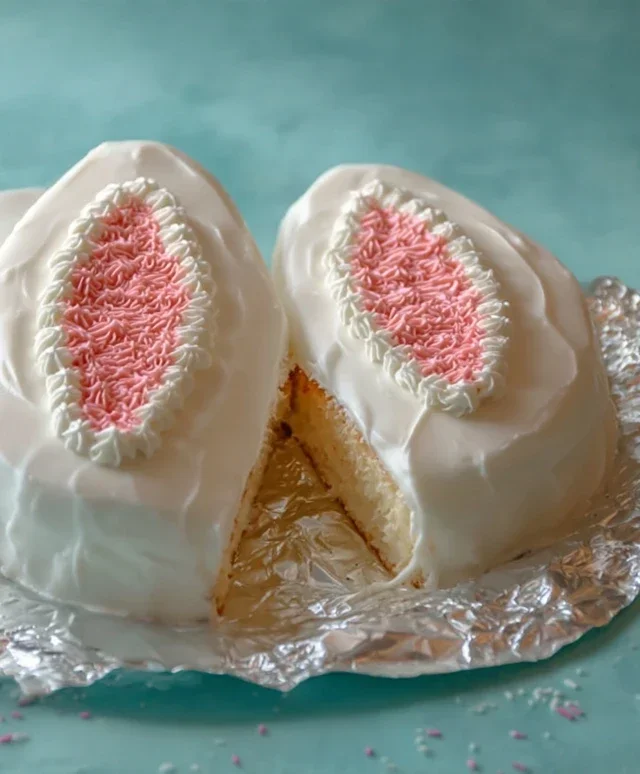
Now, take the second cake round. Cut it in half. Place one half, cut-side down, against the first cake round, creating the bunny’s head. You might want to trim a tiny bit off the bottom of the half-circle so it sits flush against the body cake. Next, we’ll create the ears. Take the remaining half of the second cake round and cut two ear shapes. You can do this freehand, or by drawing a simple ear shape on parchment paper and cutting it out to use as a template. Place these ear shapes on top of the head portion. You can use a little bit of frosting to help them adhere. For a more secure fit, you can also insert a toothpick through the cake ear and into the cake head.
Frosting and Decorating
Now for the fun part: frosting! In a large bowl, beat the softened butter until smooth and creamy. Gradually add the powdered sugar, alternating with the milk, and beating until the frosting is light and fluffy. Add the vanilla extract and beat again. This frosting is a classic buttercream, perfect for its smooth texture and delicious taste. You might need to adjust the amount of milk slightly depending on the consistency you desire. If it’s too thick, add a little more milk, a teaspoon at a time. If it’s too thin, add more powdered sugar.
Start by applying a thin layer of frosting all over the cake. This is called a crum extractb coat, and it helps to seal in any loose crum extractbs. Chill the cake in the refrigerator for about 15-20 minutes until the crum extractb coat is firm. This will prevent crum extractbs from getting into your final layer of frosting, resulting in a much cleaner finish. Once chilled, apply a thicker, final layer of frosting, smoothing it out as best as you can.
The Finishing Touches
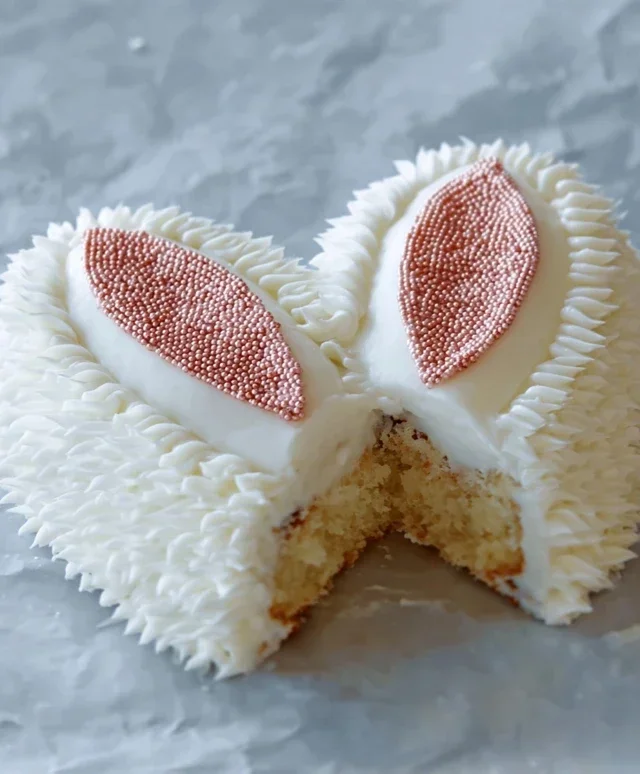
Now, let’s add those adorable bunny details! For the bunny’s fur, gently press shredded coconut all over the frosted cake. This gives a wonderful fluffy texture. For the eyes, place two chocolate chips on the head where you envision the bunny’s eyes. For the nose, a little cluster of pink sprinkles works perfectly, or you can use a small dollop of pink-tinted frosting. For the inside of the ears, you can add a touch more shredded coconut or a few more pink sprinkles to mimic the inner ear. You can also add edible flowers or candy eggs around the base of the cake for a festive touch. Don’t be afraid to get creative and make your bunny uniquely yours! This is where your personality can really shine. Enjoy the process, and remember, the most important ingredient is always love!
Conclusion:
And there you have it – your very own adorable Bunny Rabbit Cake! This recipe truly is a winner because it’s not only visually charming, making it perfect for Easter, birthdays, or any spring celebration, but it’s also wonderfully adaptable and surprisingly straightforward to make. The fluffy cake layers paired with the creamy frosting are a delightful combination that appeals to all ages. Whether you’re a seasoned baker or just starting out, I encourage you to give this recipe a try. It’s a fantastic way to add a touch of magic and homemade goodness to your next gathering.
For serving, this Bunny Rabbit Cake is a showstopper on its own, but you can elevate it further with fresh berries, a dusting of powdered sugar resembling snow, or even a scattering of edible flowers. Consider pairing it with a light and fruity beverage like lemonade or a strawberry smoothie.
Don’t be afraid to get creative with variations! You can use your favorite cake flavor, such as chocolate or lemon, and experiment with different frosting colors and decorations. Adding a touch of food coloring to the frosting to create pastel shades for the ears and tail can be a fun touch. For a richer flavor, consider adding a hint of almond extract to the batter.
Frequently Asked Questions:
Can I make this cake ahead of time?
Yes, absolutely! You can bake the cake layers and store them tightly wrapped in plastic wrap at room temperature for up to two days, or freeze them for up to a month. Frosting can also be made ahead and stored in the refrigerator, but you may need to re-whip it slightly before frosting the cake.
What if I don’t have a bunny-shaped cake pan?
No problem at all! You can easily adapt this recipe to create a simpler bunny shape. Bake two round cakes, and use one as the body. Cut a portion of the second cake to create the head and ears, attaching them with frosting. Alternatively, you could bake cupcakes and arrange them in a bunny shape on a platter, frosting them together.
How long will the Bunny Rabbit Cake last?
Once frosted and at room temperature, the cake is best enjoyed within 2-3 days. If you need to store it longer, cover it loosely with plastic wrap and refrigerate. Let it come to room temperature for about 30 minutes before serving for optimal taste and texture.
Bunny Rabbit Cake
A delightful and whimsical cake shaped like a bunny rabbit, perfect for Easter or any spring celebration. This recipe features a moist vanilla cake base and is decorated to resemble a cute bunny.
Ingredients
-
2 cups all-purpose flour
-
1.5 cups granulated sugar
-
2.5 teaspoons baking powder
-
0.5 teaspoon salt
-
1 cup milk
-
0.5 cup unsalted butter, softened
-
2 large eggs
-
1 teaspoon vanilla extract
-
Buttercream frosting (recipe not provided, for decorating)
Instructions
-
Step 1
Preheat your oven to 350°F (175°C). Grease and flour two 8-inch round cake pans, and one small bowl for the ears and tail. -
Step 2
In a large bowl, whisk together the flour, sugar, baking powder, and salt. -
Step 3
In a separate medium bowl, whisk together the milk, softened butter, eggs, and vanilla extract until well combined. -
Step 4
Gradually add the wet ingredients to the dry ingredients, mixing until just combined. Do not overmix. -
Step 5
Pour the batter evenly into the prepared cake pans. For the bunny ears and tail, pour a small amount of batter into the small bowl and bake for a shorter time until set. -
Step 6
Bake for 30-35 minutes, or until a toothpick inserted into the center comes out clean. Bake the ear and tail portion until set, checking frequently. -
Step 7
Let the cakes cool in the pans for 10 minutes before inverting them onto a wire rack to cool completely. -
Step 8
Once completely cooled, assemble the cake by cutting one round cake in half and placing the two halves upright on a serving platter to form the bunny’s ears. Place the other round cake behind the ears for the bunny’s body. Shape and attach the baked small bowl cake portions for the tail and facial features as desired. -
Step 9
Decorate the assembled cake with buttercream frosting to create the bunny’s fur, eyes, nose, and any other desired details. Use food coloring as needed.
Important Information
Nutrition Facts (Per Serving)
It is important to consider this information as approximate and not to use it as definitive health advice.
Allergy Information
Please check ingredients for potential allergens and consult a health professional if in doubt.

Leave a Comment